Director,
T.E.(Terry)
Manning,
Schoener 50,
1771 ED
Wieringerwerf,
The
Tel:
0031-227-604128
Homepage:
http://www.flowman.nl
E-mail:
(nameatendofline)@xs4all.nl : bakensverzet
Incorporating
innovative social, financial, economic, local administrative and productive
structures, numerous renewable energy applications, with an important role for
women in poverty alleviation in rural and poor urban environments.
"Money is not
the key that opens the gates of the market but the bolt that bars them"
Gesell, Silvio The
Natural Economic Order
Revised English
edition, Peter Owen, London 1958, page 228
Edition 9:
The following pages contain information on how to fit
the electric cable, the safety rope, and installing the pump in the well or
borehole. If you are more interested in other aspects concerning installation,
please return to the installation index.
The size of all electric cables used is important.
However the most important cable of all is the one between the controller and
the pump, or, where systems are used with batteries without controllers,
between the batteries and the pump. The specified electric must be high quality
submersible pump cable suitable for continuous immersion in water. Its global
electrical resistance (for both the ingoing and the outgoing wires together)
must be as low as possible and in any case NEVER GREATER THAN 1.5 OHM.
In general INDICATIVE terms this corresponds to cables with wires with a
section of 2.5mm2 or larger for lengths up to 80 meters, 4mm2 or larger for
lengths of up to 150 meters, and 6mm2 or larger for cables longer than 150
meters. Such INDICATIVE sizes assume that the cable wires are of pure metal and
that cable joints are few and well executed. Environmental circumstances and/or
cable quality may, however, be such that a larger cable than that indicated may
be required.
Electrical cables which are too small for the application in question will
cause loss of efficiency of the pumping system, difficulties on start up, and
evaluation and operational errors on the part of the controller used.
The total length of your electric cable below ground
level must be at least 1m greater than that of both the feed pipe and of the
safety rope. The electric cable must NEVER bear the weight of the below ground
installation.
The feed pipe can stretch by about 1cm per metre. If, by way of example,
the length of the feed pipe is 60m, the safety rope should therefore be 60.6m
long, and the below ground part of the electric cable therefore between 61,75 and
62 m. long. Remember, before cutting the cable, to allow for the distance to
the panel support system and for the height of the panel support system! Some
operators prefer to have a free loop of cable at the bottom of the borehole as
shown in the attached drawing.
If you have bought a Solar Spring kit, the length of
electric cable of electric cable required will normally be supplied as part of
the kit. In this case, no electric cable joints will have to be made, unless
you vary your installation or decide to use your pump in another location.
Otherwise, your Solar Spring pump is usually supplied with a 1.5m length of
cable, and it will be necessary to use a cable splice kit to extend the 1.5m
length supplied with the pump.
The 1.5m length of cable supplied is normally 3 x 2.5mm2 diameter
neoprene cable. The wires are multiple strand with strands sealed together
inside an inner sheath. At the point of entry into the pump the three inner
sheaths are sealed within the outer sheath and the outer sheath is sealed to
the motor cover so that, on sale, water cannot enter or escape from the pump
through the electric cable. Should this 1.5m length of cable for any reason
ever require replacement, please contact your Solar Spring supplier BEFORE
doing so, as replacement should be carried out by an expert.
NEVER leave coils of surplus cable on-line at the well-head. Such coils
can create a secondary inductive current which has been known on rare occasions
to confuse controller components.
Neoprene tends to discolour. The colours of the wires from the pump are
:
1)
Brown (positive) (or negative, as the pump can turn in either direction)
2) Black (negative) (or positive, as the pump can turn in either direction)
3) Blue: EARTH, to be connected (ONLY IF ABSOLUTELY UNAVOIDABLE!) to earth, or
preferably and wherever possible well isolated and not used.
All wire sizes are important and electric cables must
be generously sized. The most important cable is however the one which goes
from the controller (or from the batteries) to the pump. The Solar Spring
system has been designed as a 48V nominal system specifically to avoid
unnecessary cable costs. Please respect this policy and use appropriately sized
cable with your pump.
The type of electric cable to be used for joining to the 1.5m length
supplied with your Solar Spring pump can be any standard good quality borehole
submersible or trailing cable which is fully and 100% guaranteed against water
absorption over its entire life cycle. Overall electrical resistance of the
cable ( ingoing and outgoing together) MUST NOT EXCEED 1.5 Ohm. Indicatively 3
x 2.5mm2 core cable is sufficient for depths up to 80m, and 3 x 4mm2 be used
for greater depths. Higher resistances could cause excessive voltage losses,
with reduction in global system efficiency, and also readings errors on the
part of the Sunprimer unit. If the metal used for the wires is not absolutely
pure and/or the wire splicing is not well carried out, larger cables than those
here foreseen may be required. Cables with higher resistances may cause loss of
system efficiency, starting difficulties, and also interpretation and operating
errors on the part of the Sunprimer controller.
GOLDEN RULE ONE: Try to keep the cable between the controller and the
pump as short as is reasonably possible, and to submerge the pump as little as
is practically necessary. Where the panels have to be placed a long way away
from the water source, then, contrary to what one would instinctively do
placing the controller with the panels, separate the controller from the panels
and place the controller close to the water source. Use only high quality cable
with guaranteed copper content and resistance. Use of wire which is too small
may result in faulty operation and possible motor damage for which neither
manufacturer nor distributor will accept liability.
GOLDEN RULE TWO: In marginal cases or where the pump does or may have
difficulty getting started a) use a larger cable b) if necessary use a smaller
cam.
GOLDEN RULE THREE: Be conservative with choice of cable size! Cables
with resistances which are too high for the application concerned ARE THE MAIN
CAUSE OF PROBLEMS DURING INSTALLATION!
Cable and safety rope should be tied to the
polyethylene feed pipe using POLYPROPYLENE cable ties. DO NOT USE NYLON TIES
which look the same, but stretch on contact with water.
Lifting the pump by the electric cable is STRICTLY
PROHIBITED and must never be done whatever the circumstances. The pump must be
lifted ONLY BY THE FEED PIPE .
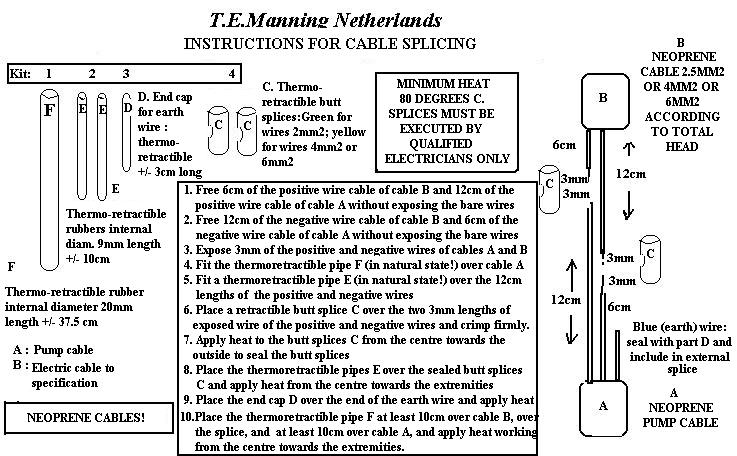
We recommend that cable splicing be done by an expert.
The splices should be absolutely water-tight and safe. For details of the
splicing kit and instructions for splicing refer to: cable
splicing instructions.
Every possible precaution technically available has been taken to avoid
possibility of water infiltration into the motor chamber either along the
electric cable or through other pump parts. The manufacturer's warranty does
not however cover loss or damage howsoever attributable to poorly executed
cable splices.
Please refer to the accompanying drawing for an example of cable
splicing. Follow the cable splice manufacturer's instructions carefully.
If you have purchased a Solar Spring kit a safety rope
may be included in your kit. Otherwise, the safety rope is not supplied with
your Solar Spring pump unless ordered separately.
The safety rope has an emergency use only. Should the feed pipe get
detached, the rope will enable the pump and motor group, eventually together
with the feed pipe itself, to be recovered from the bottom of the borehole. It
is the feed pipe which normally carries the weight of the pump. The safety rope
should not therefore be under tension in the bore-hole. FAILURE TO USE A SAFETY
ROPE COULD IN SOME CIRCUMSTANCES LEAD TO LOSS OF USE OF YOUR BORE-HOLE.
The safety rope should be about one centimetre longer than the feed pipe
for each metre of feed pipe which is below ground level, plus any further
length eventually needed to attach it to an appropriate point above ground. It
should, however, be shorter than the below ground part of the electric cable,
in such manner that should the feed pipe come loose, the weight of the
installation is on the safety rope and not on the electric cable.
Use polypropylene rope with a diameter of 8mm, in any case rope rated at
400-500 kg. Remember that the rope may be in place for several years without
being inspected, and a part of it may be alternately out of the water and under
the water either on a seasonal basis or even on a daily basis where changes in
the level of water in the bore-hole take place. Do not use nylon rope as it
tends with time to stretch when in contact with water.
After having cut the rope to the required length, connect one end to the
two eyes in the upper flange (part 314) and the other end to an appropriate
point underneath the well seal or the well cap. If the well cap does not have a
place for a rope, install an eye bolt. IMPORTANT ! Make sure there is no
possibility of animals or people tripping over or pulling the rope, or danger
of cutting the rope by friction or by machinery. Try not to leave rope exposed
to sunlight.
Tie the safety rope to the well cap or well seal BEFORE you proceed with
the installation of the pump!
(Refer to accompanying drawing)
THE PUMP MUST BE SET BELOW THE MINIMUM FORESEEABLE
SEASONAL WATER LEVEL IN THE BORE-HOLE. Your Solar Spring pump can run dry
without suffering damage, so level sensors are not required. However water will
in such case obviously not be pumped and the purpose of the installation will
be defeated. The pump should not, however, be submerged more than necessary,
indicatively 5-10 meters below the minimum foreseeable water level in the
borehole.
Your bore-hole should be carefully sealed off in order to stop water,
dirt, insects, and the like from entering the bore-hole and fouling and
polluting the water in the bore-hole. If the water in your bore-hole becomes
polluted, the reason for your having invested in the bore-hole and in your
Solar Spring pumping system is defeated!
Your Solar Spring pump has already been connected to :
a)
The feed pipe
b) The electric cable
c) The safety rope and
d) the safety rope has already been firmly fastened to an appropriate anchor
above ground.
e) Now check that there is water in the bore-hole and the water level!
The electric cable and the safety rope have been attached by way of
polypropylene cable ties at intervals of about 3-4 meters, making sure that at
each cable tie there is enough slack in the electric cable to allow for feed
pipe stretch, but LESS slack in the safety rope so that it will be the safety
rope that takes the weight of the installation in case of loss or excessive
stretching of the feed pipe.
It is best to suspend your Solar Spring pump from the middle point of your
bore-hole.
The pump and motor group may now be lowered down the bore-hole as
illustrated :
DO
NOT BEND THE FEED PIPE MORE THAN NECESSARY
DO NOT TWIST THE SAFETY CORD AROUND THE FEED PIPE
DO NOT TWIST THE ELECTRIC CABLE AROUND THE FEED PIPE
Snake the feed pipe over the ground with the pump already connected, the
electric cable already fitted, and the safety rope already attached with its
one end to the pump and its other end firmly and securely fastened to its upper
support (eyelet) under the well cap or other point chosen or created for the
purpose. Lay a barrel (oil drum) or similar rounded object next to the well
head. Run the pipe, cable and rope over the round surface to ease the downward
bend and to prevent scraping against the edge of the casing.
The in-well assembly should hang with the weight on
the pipe.
How much weight are you working with? Calculate the total required.
You need one normal person for each 22kg of weight, PLUS one additional person
to drag the pipe and cable away as it is withdrawn.
Example of calculation:
Pump
: 14-16 kg (depending on model)
10 bar feed pipe : 11kg per 35m full of water
16 bar feed pipe : (for general use) 7kg per 35m full of water
Electric cable : 13kg per 35m
Where the pump is installed just a little below the
level of water in the water source, there may be insufficient water pressure at
the pump inlet for the valve group is able to perform its self-cleaning
functions. If you intend to install your pump less than 1m below water level,
contact your supplier. Inability of the valve group to self-clean is evidenced
by a more or less rapid decay in pump capacity usually accompanied by a
contemporaneous decrease in the current absorbed by the motor and is due to the
fact that the external pressure of water at the outlet is insufficient to force
water through the lower valve system into the pump. Should this phenomenon
occur, the installation criteria must be reviewed. However, the pump itself
does not suffer damage.
Where algae are present in or on the water in shallow installations from
lakes, rivers, tanks etc, these may enter the pump and "grow" in such
a manner as to impede pump operation and/or reduce pump capacity. The algae
will not harm the pump, but in such situations the pump may have to be visited
regularly for cleaning. The following steps may be taken to try to reduce need
for cleaning requirements:
-Fit
a filter/strainer with a finer mesh
-Fit filter cloth over/around the filter
-Set the pump as deep into the water as possible where there are fewer algae.
-In case of special recurrent difficulty consult your supplier.
Menu installation
Solar Spring pumps.
Some
recommended technologies.
List of
attachments to the Model.
Typical list of graphs and
drawings.
List of abbreviations used.
List of key words.
Documents for funding
applications.